61 KiB
Using a reverse proxy or secure tunnel to access Nextcloud AIO
Introduction
This guide explains how to connect to Nextcloud AIO securely via HTTPS (TLS) using a reverse proxy or a secure tunneling platform. It covers several potential scenarios:
- Integrated: AIO's built-in reverse proxy with automatic HTTPS
- External: An external reverse proxy (such as Caddy or Nginx or Cloudflare Proxy)
- Secure tunnel: Tunneling services for private network access or public access without port forwarding (such as Tailscale Serve or Cloudflare Tunnel)
Choosing Your Approach
Tip
If AIO's internal reverse proxy meets your needs, you may not need to set up your own reverse proxy. See the next section to assess whether this is the case.
Note
If your goal is to use AIO purely locally, refer to the Local instance documentation. Local instance setups don't require domain validation.
When to use each approach
| Approach | Best for | Requirements | Inbound Ports Required |
|---|---|---|---|
| Integrated | Simple setups, single service on port 443 | Public IP, dedicated port 443 | Yes (443) |
| External Reverse Proxy (including Cloudflare Proxy) | Multiple services, existing web server, or users wanting DDoS protection | Existing reverse proxy, willingness to set one up, or Cloudflare account | Yes (443) |
| Cloudflare Tunnel | No port forwarding possible/desired, public access | Cloudflare account | No |
| Tailscale Serve | Private access (tailnet only) | Tailscale account | No |
| Tailscale Funnel | Public access via Tailscale | Tailscale account | No |
Implementation Details
Integrated: Using AIO's internal reverse proxy with built-in HTTPS support
Nextcloud AIO is secured with TLS (HTTPS) out of the box via its internal reverse proxy. The integrated HTTPS support works well if your goal is to make AIO accessible from the public Internet and to ensure all traffic is encrypted with HTTPS.
Requirements:
- A public IP address that is reachable from the Internet (it does not need to be static, but it must not be behind carrier-grade NAT, which some ISPs use to share IP addresses among multiple customers).
- Port
443/tcpon that IP must be available for AIO's exclusive use, and it must be opened/forwarded on your internet-facing firewall/router to the AIO host.1
If AIO's integrated HTTPS support and internal reverse proxy meet your requirements, you do not need to proceed further. Follow the standard Nextcloud AIO instructions.
External: Using AIO with an external reverse proxy (e.g., Caddy, Nginx, Cloudflare Proxy)
When you use an external reverse proxy, you disable AIO's built-in HTTPS support because your reverse proxy will handle HTTPS/TLS certificates and encryption instead. This approach is necessary when:
- Port 443 is already in use by another service
- You want to run multiple web services on the same IP address
- You already have an existing reverse proxy infrastructure
A reverse proxy (or a web server acting as a reverse proxy) enables multiple web applications to share the same IP address and/or port (for example 443/tcp) by directing traffic based on each application's hostname (often called "virtual hosts"). Incoming requests reach the reverse proxy and are then forwarded to the appropriate internal IP address, port, or container based on the requested hostname.
Types of external reverse proxies:
- Self-hosted (Caddy, Nginx, Apache, Traefik, HAProxy, etc.) - You manage the reverse proxy on your own server or separate server
- Cloudflare Proxy (orange-clouded DNS) - Cloudflare provides the reverse proxy at their edge network with DDoS protection and CDN benefits. This is distinct from Cloudflare Tunnel, though Tunnel can optionally use these proxy features when publishing routes.
Most notably, an external reverse proxy allows you to:
- share one external IP address among multiple hostnames/web applications, and
- use a different internal port than the externally used port.
Using an existing external reverse proxy is required in particular if port 443/tcp on your public IP is already in use by another web application or by an existing web server/reverse proxy (for example Caddy or Nginx).
Note
Cloudflare Tunnel and Cloudflare Proxy are different approaches:
- Cloudflare Tunnel doesn't require opening any inbound ports on your firewall.
- Cloudflare Proxy still requires port 443 exposed on your server.
Tip
Examples of web servers or reverse proxies you might already be running include Apache, Caddy, Nginx, Traefik, and HAProxy — but only if they are bound to port
443/tcpon the IP address you plan to associate with AIO.
Note
An external reverse proxy can also facilitate other routing approaches, but Nextcloud AIO only supports having its own dedicated hostname (e.g.,
cloud.example.com). You cannot run it in a subfolder likeexample.com/nextcloud/.2
Secure tunnel: Using AIO with a secure tunneling service (Tailscale, Cloudflare)
Cloudflare and Tailscale offer secure tunneling services that let you access your Nextcloud without opening ports on your firewall.
Private network access
For Nextcloud AIO, you can use:
- Cloudflare Tunnel (
cloudflared) - Secure outbound-only tunnels that don't require exposing ports - Tailscale Serve - Expose services privately on your Tailscale network (tailnet only)
Both options provide private network access to your Nextcloud AIO instance.
Public Internet access (without port forwarding)
To make your Nextcloud AIO instance accessible from the public Internet (not just your private network), you can use:
- Cloudflare Tunnel with public routes enabled (which combines Cloudflare Tunnel with Cloudflare's proxy features)
- Tailscale Funnel - Expose services to the public Internet via Tailscale's infrastructure
Comparison of Cloudflare and Tailscale options:
| Feature | Access Scope | Inbound Ports Required | Use Case |
|---|---|---|---|
| Cloudflare Tunnel | Public Internet | None | Public access without port forwarding |
| Tailscale Serve | Your Tailscale network only | None | Private access for you and invited users |
| Tailscale Funnel | Public Internet | None | Public access through Tailscale |
Tip
Because of how Cloudflare's Tunnel/Proxy operate, we recommend using Tailscale with Nextcloud when possible. Tailscale typically offers better performance and fewer trade-offs/limitations for Nextcloud.
For private/personal use: Tailscale Serve is ideal - it keeps your Nextcloud completely private to your tailnet.
For public access without port forwarding: Use Tailscale Funnel.
Configuration and Deployment
Note
These instructions assume you already have a domain name pointing to your server's public IP address. If you don't have a domain yet, see the recommendations below.
Quick overview
To run Nextcloud AIO behind an external reverse proxy or secure tunneling/proxying service (instead of using AIO's integrated reverse proxy), the basic process is:
- Configure your web server or reverse proxy with the specific settings for AIO.
- Specify the port that AIO's integrated Apache container will use.
- Open the AIO interface and validate your domain.
The sections below provide detailed instructions for each step.
Tip
If you don't have a domain yet, we recommend using an approach using Tailscale. If you don't have an external reverse proxy yet, we recommend Caddy.
Step-by-Step Instructions
The process to run Nextcloud AIO behind a reverse proxy has three required steps and three optional steps:
Required steps:
- Configure your web server or reverse proxy with the specific settings for AIO. See "Configuring your reverse proxy" below.
- Specify the port that AIO's integrated Apache container will use via the environment variable
APACHE_PORT, and update thedocker runcommand or your Compose file accordingly. See "Use this startup command" below.- Optional: Limit the access to the Apache container. See "Limit the access to the Apache container".
- Open the AIO interface at port
8080, enter your domain, and validate it. See "Open the AIO interface" below.
Optional steps:
- Configure additional settings if your reverse proxy uses an IP address to connect to AIO. See "Configure AIO for IP-based reverse proxies".
- Get a valid certificate for the AIO interface. See "Get a valid certificate for the AIO interface".
- Debug things if needed. See "How to debug things".
Note
If you run into troubles, see the debug section.
Important
If you need HTTPS between Nextcloud and the reverse proxy (because the reverse proxy runs on a different server), you have two options:
- Add a local reverse proxy: Install another reverse proxy on the same server as AIO to handle HTTPS (typically with self-signed certificates)
- Use a VPN: Create a VPN tunnel between the AIO server and the reverse proxy server to encrypt the connection
Note
Since the Apache container gets created by the mastercontainer, there is NO way to provide custom Docker labels or custom environmental variables for the Apache container. So please do not attempt to do this because it will fail!
1. Configure the reverse proxy
Adapting the sample web server configurations below
-
Replace
<your-nc-domain>with the domain on which you want to run Nextcloud. -
Adjust the port
11000to match your chosenAPACHE_PORT. -
Adjust
localhostor127.0.0.1to point to the Nextcloud server IP or domain depending on where the reverse proxy is running. See the following options.On the same server without a container
For this setup, the default sample configurations with
localhost:$APACHE_PORTshould work.On the same server in a Docker container
The reverse-proxy container needs to be connected to the nextcloud containers. This can be achieved one of these 3 ways:
- Utilize host networking instead of docker bridge networking: Specify
--network hostoption (ornetwork_mode: hostfor docker-compose) as setting for the reverse proxy container to connect it to the host network. If you are using a firewall on the server, you need to open ports 80 and 443 for the reverse proxy manually. With this setup, the default sample configurations with reverse-proxy pointing tolocalhost:$APACHE_PORTshould work directly. - Connect nextcloud's external-facing containers to the reverse-proxy's docker network by specifying env variable APACHE_ADDITIONAL_NETWORK. With this setup, the reverse proxy can utilize Docker bridge network's DNS name resolution to access nextcloud at
http://nextcloud-aio-apache:$APACHE_PORT. ⚠️⚠️⚠️ Note, the specified network must already exist before Nextcloud AIO is started. Otherwise it will fail to start the container because the network is not existing. - Connect the reverse-proxy container to the
nextcloud-aionetwork by specifying it as a secondary (external) network for the reverse proxy container. With this setup also, the reverse proxy can utilize Docker bridge network's DNS name resolution to access nextcloud athttp://nextcloud-aio-apache:$APACHE_PORT.
On a different server (in container or not)
Use the private ip-address of the host that shall be running AIO. So e.g.
private.ip.address.of.aio.server:$APACHE_PORTinstead oflocalhost:$APACHE_PORT.If you are not sure how to retrieve that, you can run:
ip a | grep "scope global" | head -1 | awk '{print $2}' | sed 's|/.*||'on the server that shall be running AIO (the commands only work on Linux). - Utilize host networking instead of docker bridge networking: Specify
Apache
click here to expand
Disclaimer: It might be possible that the config below is not working 100% correctly, yet. Improvements to it are very welcome!
Add this as a new Apache site config:
(The config below assumes that you are using certbot to get your certificates. You need to create them first in order to make it work.)
<VirtualHost *:80>
    ServerName <your-nc-domain>

    RewriteEngine On
    RewriteCond %{HTTPS} off
    RewriteRule (.*) https://%{HTTP_HOST}%{REQUEST_URI}
    RewriteCond %{SERVER_NAME} =<your-nc-domain>
    RewriteRule ^ https://%{SERVER_NAME}%{REQUEST_URI} [END,NE,R=permanent]
</VirtualHost>

<VirtualHost *:443>
    ServerName <your-nc-domain>

    # Reverse proxy based on https://httpd.apache.org/docs/current/mod/mod_proxy_wstunnel.html
    RewriteEngine On
    ProxyPreserveHost On
    RequestHeader set X-Real-IP %{REMOTE_ADDR}s
    AllowEncodedSlashes NoDecode

    # Adjust the two lines below to match APACHE_PORT and APACHE_IP_BINDING. See https://github.com/nextcloud/all-in-one/blob/main/reverse-proxy.md#adapting-the-sample-web-server-configurations-below
    ProxyPass / http://localhost:11000/ nocanon
    ProxyPassReverse / http://localhost:11000/

    RewriteCond %{HTTP:Upgrade} websocket [NC]
    RewriteCond %{HTTP:Connection} upgrade [NC]
    RewriteCond %{THE_REQUEST} "^[a-zA-Z]+ /(.*) HTTP/\d+(\.\d+)?$"
    RewriteRule .? "ws://localhost:11000/%1" [P,L,UnsafeAllow3F] # Adjust to match APACHE_PORT and APACHE_IP_BINDING. See https://github.com/nextcloud/all-in-one/blob/main/reverse-proxy.md#adapting-the-sample-web-server-configurations-below

    # Enable h2, h2c and http1.1
    Protocols h2 h2c http/1.1

    # Solves slow upload speeds caused by http2
    H2WindowSize 5242880

    # TLS
    SSLEngine               on
    SSLProtocol             -all +TLSv1.2 +TLSv1.3
    SSLCipherSuite          ECDHE-ECDSA-AES128-GCM-SHA256:ECDHE-RSA-AES128-GCM-SHA256:ECDHE-ECDSA-AES256-GCM-SHA384:ECDHE-RSA-AES256-GCM-SHA384:ECDHE-ECDSA-CHACHA20-POLY1305:ECDHE-RSA-CHACHA20-POLY1305:DHE-RSA-AES128-GCM-SHA256:DHE-RSA-AES256-GCM-SHA384:DHE-RSA-CHACHA20-POLY1305
    SSLHonorCipherOrder     off
    SSLSessionTickets       off

    # If running apache on a subdomain (eg. nextcloud.example.com) of a domain that already has an wildcard ssl certificate from certbot on this machine,
    # the <your-nc-domain> in the below lines should be replaced with just the domain (eg. example.com), not the subdomain.
    # In this case the subdomain should already be secured without additional actions
    SSLCertificateFile /etc/letsencrypt/live/<your-nc-domain>/fullchain.pem
    SSLCertificateKeyFile /etc/letsencrypt/live/<your-nc-domain>/privkey.pem

    # Disable HTTP TRACE method.
    TraceEnable off
    <Files ".ht*">
        Require all denied
    </Files>

    # Support big file uploads
    LimitRequestBody 0
    Timeout 86400
    ProxyTimeout 86400
</VirtualHost>
⚠️ Please note: Look into this to adapt the above example configuration.
To make the config work you can run the following command:
sudo a2enmod rewrite proxy proxy_http proxy_wstunnel ssl headers http2
Caddy (recommended)
click here to expand
Hint: You may have a look at this guide for a more complete but possibly outdated example.
Add this to your Caddyfile:
https://<your-nc-domain>:443 {
    reverse_proxy localhost:11000 # Adjust to match APACHE_PORT and APACHE_IP_BINDING. See https://github.com/nextcloud/all-in-one/blob/main/reverse-proxy.md#adapting-the-sample-web-server-configurations-below
}
The Caddyfile is a text file called Caddyfile (no extension) which – if you should be running Caddy inside a container – should usually be created in the same location as your compose.yaml file prior to starting the container.
⚠️ Please note: look into this to adapt the above example configuration.
Advice: You may have a look at this for a more complete example.
Caddy with ACME DNS-challenge
click here to expand
You can get AIO running using the ACME DNS-challenge. Here is how to do it.
-
Follow this documentation in order to get a Caddy build that is compatible with your domain provider's DNS challenge.
-
Add this to your Caddyfile:
https://<your-nc-domain>:443 {
    reverse_proxy localhost:11000 # Adjust to match APACHE_PORT and APACHE_IP_BINDING. See https://github.com/nextcloud/all-in-one/blob/main/reverse-proxy.md#adapting-the-sample-web-server-configurations-below
    tls {
        dns <provider> <key>
    }
}
⚠️ Please note: Look into this to adapt the above example configuration.
You also need to adjust
<provider>and<key>to match your case. -
Now continue with point 2 but additionally, add
--env SKIP_DOMAIN_VALIDATION=trueto the docker run command of the mastercontainer (but before the last lineghcr.io/nextcloud-releases/all-in-one:latest) which will disable the domain validation (because it is known that the domain validation will not work when using the DNS-challenge since no port is publicly opened).
Advice: In order to make it work in your home network, you may add the internal ipv4-address of your reverse proxy as A DNS-record to your domain and disable the dns-rebind-protection in your router. Another way it to set up a local dns-server like a pi-hole and set up a custom dns-record for that domain that points to the internal ip-adddress of your reverse proxy (see https://github.com/nextcloud/all-in-one#how-can-i-access-nextcloud-locally). If both is not possible, you may add the domain to the hosts file which is needed then for any devices that shall use the server.
OpenLiteSpeed
click here to expand
You can find the OpenLiteSpeed reverse proxy guide by @MorrowShore here: https://github.com/nextcloud/all-in-one/discussions/6370
Citrix ADC VPX / Citrix Netscaler
click here to expand
For a reverse proxy example guide for Citrix ADC VPX / Citrix Netscaler, see this guide by @esmith443: https://github.com/nextcloud/all-in-one/discussions/2452
Cloudflare Tunnel
click here to expand
Hint: You may have a look at this guide for a more complete but possibly outdated example.
Although it does not seem like it is the case but from AIO perspective a Cloudflare Tunnel works like a reverse proxy. Please see the caveats before proceeding. Here is then how to make it work:
- Install the Cloudflare Tunnel on the same machine where AIO will be running on and point the Tunnel with the domain that you want to use for AIO to
http://localhost:11000.
⚠️ Please note: look into this to adapt the above example configuration. - Now continue with point 2 but add
--env SKIP_DOMAIN_VALIDATION=trueto the docker run command - which will disable the domain validation (because it is known that the domain validation will not work behind a Cloudflare Tunnel).
Advice: Make sure to disable Cloudflare's Rocket Loader feature as otherwise Nextcloud's login prompt will not be shown.
HAProxy
click here to expand
Disclaimer: It might be possible that the config below is not working 100% correctly, yet. Improvements to it are very welcome!
Here is an example HaProxy config:
global
    chroot                      /var/haproxy
    log                         /var/run/log audit debug
    lua-prepend-path            /tmp/haproxy/lua/?.lua
    ssl-default-bind-ciphers ECDHE-ECDSA-AES128-GCM-SHA256:ECDHE-RSA-AES128-GCM-SHA256:ECDHE-ECDSA-AES256-GCM-SHA384:ECDHE-RSA-AES256-GCM-SHA384:ECDHE-ECDSA-CHACHA20-POLY1305:ECDHE-RSA-CHACHA20-POLY1305:DHE-RSA-AES128-GCM-SHA256:DHE-RSA-AES256-GCM-SHA384:DHE-RSA-CHACHA20-POLY1305
    ssl-default-bind-ciphersuites TLS_AES_128_GCM_SHA256:TLS_AES_256_GCM_SHA384:TLS_CHACHA20_POLY1305_SHA256
    ssl-default-bind-options ssl-min-ver TLSv1.2 no-tls-tickets

    ssl-default-server-ciphers ECDHE-ECDSA-AES128-GCM-SHA256:ECDHE-RSA-AES128-GCM-SHA256:ECDHE-ECDSA-AES256-GCM-SHA384:ECDHE-RSA-AES256-GCM-SHA384:ECDHE-ECDSA-CHACHA20-POLY1305:ECDHE-RSA-CHACHA20-POLY1305:DHE-RSA-AES128-GCM-SHA256:DHE-RSA-AES256-GCM-SHA384:DHE-RSA-CHACHA20-POLY1305
    ssl-default-server-ciphersuites TLS_AES_128_GCM_SHA256:TLS_AES_256_GCM_SHA384:TLS_CHACHA20_POLY1305_SHA256
    ssl-default-server-options ssl-min-ver TLSv1.2 no-tls-tickets

defaults
    log     global
    option redispatch -1
    retries 3
    default-server init-addr last,libc

# Frontend: LetsEncrypt_443 ()
frontend LetsEncrypt_443
    bind 0.0.0.0:443 name 0.0.0.0:443 ssl crt-list /tmp/haproxy/ssl/605f6609f106d1.17683543.certlist
    mode http
    option http-keep-alive
    default_backend acme_challenge_backend
    option forwardfor
    # tuning options
    timeout client 30s

    # logging options
    # ACL: find_acme_challenge
    acl acl_605f6d4b6453d2.03059920 path_beg -i /.well-known/acme-challenge/
    # ACL: Nextcloud
    acl acl_60604e669c3ca4.13013327 hdr(host) -i <your-nc-domain>

    # ACTION: redirect_acme_challenges
    use_backend acme_challenge_backend if acl_605f6d4b6453d2.03059920
    # ACTION: Nextcloud
    use_backend Nextcloud if acl_60604e669c3ca4.13013327


# Frontend: LetsEncrypt_80 ()
frontend LetsEncrypt_80
    bind 0.0.0.0:80 name 0.0.0.0:80
    mode tcp
    default_backend acme_challenge_backend
    # tuning options
    timeout client 30s

    # logging options
    # ACL: find_acme_challenge
    acl acl_605f6d4b6453d2.03059920 path_beg -i /.well-known/acme-challenge/

    # ACTION: redirect_acme_challenges
    use_backend acme_challenge_backend if acl_605f6d4b6453d2.03059920

# Frontend (DISABLED): 1_HTTP_frontend ()

# Frontend (DISABLED): 1_HTTPS_frontend ()

# Frontend (DISABLED): 0_SNI_frontend ()

# Backend: acme_challenge_backend (Added by Let's Encrypt plugin)
backend acme_challenge_backend
    # health checking is DISABLED
    mode http
    balance source
    # stickiness
    stick-table type ip size 50k expire 30m
    stick on src
    # tuning options
    timeout connect 30s
    timeout server 30s
    http-reuse safe
    server acme_challenge_host 127.0.0.1:43580

# Backend: Nextcloud ()
backend Nextcloud
    mode http
    balance source
    server Nextcloud localhost:11000 # Adjust to match APACHE_PORT and APACHE_IP_BINDING. See https://github.com/nextcloud/all-in-one/blob/main/reverse-proxy.md#adapting-the-sample-web-server-configurations-below
⚠️ Please note: Look into this to adapt the above example configuration.
Nginx, Freenginx, Openresty, Angie
click here to expand
Hint: You may have a look at this guide for a more complete but possibly outdated example.
Disclaimer: This config was tested and should normally work on all modern Nginx versions. Improvements to the config are very welcome!
Add the below template to your Nginx config.
Note: please check your Nginx version by running: nginx -v and adjust the lines marked with version notes to fit your version.
map $http_upgrade $connection_upgrade {
    default upgrade;
    '' close;
}

server {
    listen 80;
    listen [::]:80;            # comment to disable IPv6

    if ($scheme = "http") {
        return 301 https://$host$request_uri;
    }
    if ($http_x_forwarded_proto = "http") {
        return 301 https://$host$request_uri;
    }

    listen 443 ssl http2;      # for nginx versions below v1.25.1
    listen [::]:443 ssl http2; # for nginx versions below v1.25.1 - comment to disable IPv6

    # listen 443 ssl;      # for nginx v1.25.1+
    # listen [::]:443 ssl; # for nginx v1.25.1+ - keep comment to disable IPv6
    # http2 on;            # uncomment to enable HTTP/2 - supported on nginx v1.25.1+

    # listen 443 quic reuseport;       # uncomment to enable HTTP/3 / QUIC - supported on nginx v1.25.0+ - please remove "reuseport" if there is already another quic listener on port 443 with enabled reuseport
    # listen [::]:443 quic reuseport;  # uncomment to enable HTTP/3 / QUIC - supported on nginx v1.25.0+ - please remove "reuseport" if there is already another quic listener on port 443 with enabled reuseport - keep comment to disable IPv6
    # http3 on;                                 # uncomment to enable HTTP/3 / QUIC - supported on nginx v1.25.0+
    # quic_gso on;                              # uncomment to enable HTTP/3 / QUIC - supported on nginx v1.25.0+
    # quic_retry on;                            # uncomment to enable HTTP/3 / QUIC - supported on nginx v1.25.0+
    # quic_bpf on;                              # improves  HTTP/3 / QUIC - supported on nginx v1.25.0+, if nginx runs as a docker container you need to give it privileged permission to use this option
    # add_header Alt-Svc 'h3=":443"; ma=86400'; # uncomment to enable HTTP/3 / QUIC - supported on nginx v1.25.0+

    proxy_buffering off;
    proxy_request_buffering off;

    client_max_body_size 0;
    client_body_buffer_size 512k;
    # http3_stream_buffer_size 512k; # uncomment to enable HTTP/3 / QUIC - supported on nginx v1.25.0+
    proxy_read_timeout 86400s;

    server_name <your-nc-domain>;

    location / {
        proxy_pass http://127.0.0.1:11000$request_uri; # Adjust to match APACHE_PORT and APACHE_IP_BINDING. See https://github.com/nextcloud/all-in-one/blob/main/reverse-proxy.md#adapting-the-sample-web-server-configurations-below

        proxy_set_header X-Forwarded-For $proxy_add_x_forwarded_for;
        proxy_set_header X-Forwarded-Port $server_port;
        proxy_set_header X-Forwarded-Scheme $scheme;
        proxy_set_header X-Forwarded-Proto $scheme;
        proxy_set_header X-Real-IP $remote_addr;
        proxy_set_header Host $host;
        proxy_set_header Early-Data $ssl_early_data;

        # Websocket
        proxy_http_version 1.1;
        proxy_set_header Upgrade $http_upgrade;
        proxy_set_header Connection $connection_upgrade;
    }

    # If running nginx on a subdomain (eg. nextcloud.example.com) of a domain that already has an wildcard ssl certificate from certbot on this machine,
    # the <your-nc-domain> in the below lines should be replaced with just the domain (eg. example.com), not the subdomain.
    # In this case the subdomain should already be secured without additional actions
    ssl_certificate /etc/letsencrypt/live/<your-nc-domain>/fullchain.pem;   # managed by certbot on host machine
    ssl_certificate_key /etc/letsencrypt/live/<your-nc-domain>/privkey.pem; # managed by certbot on host machine

    ssl_dhparam /etc/dhparam; # curl -L https://ssl-config.mozilla.org/ffdhe2048.txt -o /etc/dhparam

    ssl_early_data on;
    ssl_session_timeout 1d;
    ssl_session_cache shared:SSL:10m;

    ssl_protocols TLSv1.2 TLSv1.3;
    ssl_ecdh_curve x25519:x448:secp521r1:secp384r1:secp256r1;

    ssl_prefer_server_ciphers on;
    ssl_conf_command Options PrioritizeChaCha;
    ssl_ciphers TLS_AES_256_GCM_SHA384:TLS_CHACHA20_POLY1305_SHA256:TLS_AES_128_GCM_SHA256:ECDHE-ECDSA-AES256-GCM-SHA384:ECDHE-ECDSA-CHACHA20-POLY1305:ECDHE-ECDSA-AES128-GCM-SHA256:ECDHE-RSA-AES256-GCM-SHA384:ECDHE-RSA-CHACHA20-POLY1305:ECDHE-RSA-AES128-GCM-SHA256;
}
⚠️ Please note: look into this to adapt the above example configuration.
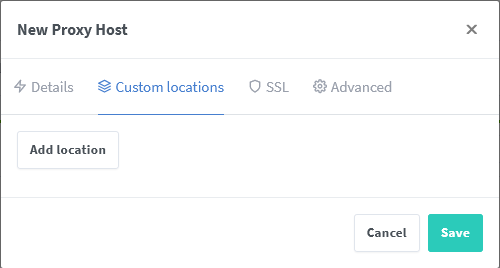
NPMplus (Fork of Nginx-Proxy-Manager - NPM)
click here to expand
⚠️ Please note: This is not needed when running NPMplus as a community container.
First, make sure the environmental variables PUID and PGID in the compose.yaml file for NPM are either unset or set to 0.
If you need to change the GID/PID then please add net.ipv4.ip_unprivileged_port_start=0 at the end of /etc/sysctl.conf.
Note: this will cause that a non root user can bind privileged ports.
Second, see these screenshots for a working config:
proxy_set_header Accept-Encoding $http_accept_encoding;
⚠️ Please note: Nextcloud will complain that X-XXS-Protection is set to the wrong value, this is intended by NPMplus.
⚠️ Please note: look into this to adapt the above example configuration.
Nginx-Proxy-Manager - NPM
click here to expand
Hint: You may have a look at this guide for a more complete but possibly oudated example.
First, make sure the environmental variables PUID and PGID in the compose.yaml file for NPM are either unset or set to 0.
If you need to change the GID/PID then please add net.ipv4.ip_unprivileged_port_start=0 at the end of /etc/sysctl.conf.
Note: this will cause that a non root user can bind privileged ports.
Second, see these screenshots for a working config:

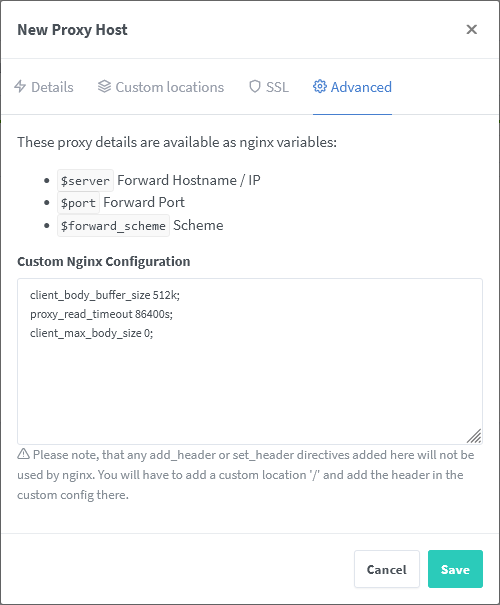
client_body_buffer_size 512k;
proxy_read_timeout 86400s;
client_max_body_size 0;
⚠️ Please note: look into this to adapt the above example configuration.
Also change <you>@<your-mail-provider-domain> to a mail address of yours.
Nginx-Proxy
click here to expand
This section refers to the dedicated project named nginx-proxy. See its GitHub repo. If you should be looking for Nginx, see the Nginx, Freenginx, Openresty, Angie section in this docu.
Unfortunately, it is not possible to configure nginx-proxy in a way that works because it completely relies on environmental variables of the docker containers itself. Providing these variables does not work as stated above.
If you really want to use AIO, we recommend you to switch to caddy. It is simply amazing!
Apart from that, there is a manual-install.
Node.js with Express
click here to expand
Disclaimer: it might be possible that the config below is not working 100% correctly, yet. Improvements to it are very welcome!
For Node.js, we will use the npm package http-proxy. WebSockets must be handled separately.
This example only uses http, but if your Express server already uses a https server, then follow the same instructions for https.
const HttpProxy = require('http-proxy');
const express = require('express');
const http = require('http');

const app = express();
const proxy = HttpProxy.createProxyServer({
	target: 'http://localhost:11000', // Adjust to match APACHE_PORT and APACHE_IP_BINDING. See https://github.com/nextcloud/all-in-one/blob/main/reverse-proxy.md#adapting-the-sample-web-server-configurations-below
	// Timeout can be changed to your liking.
	timeout: 1000 * 60 * 3,
	proxyTimeout: 1000 * 60 * 3,
	// Not 100% certain whether autoRewrite is necessary, but enabling it SEEMS to make it behave more stably.
	autoRewrite: true,
	// Do not enable followRedirects.
	followRedirects: false,
});

// Handle errors with proxy.web and proxy.ws
function onProxyError(err, req, res, target) {
	// Handle errors however you like. Here's an example:
	if (err.code === 'ECONNREFUSED') {
		return res.status(503).send('Nextcloud server is currently not running. It may be down for temporary maintenance.');
	}
	// other errors
	else {
		console.error(err);
		return res.status(500).send(String(err));
	}
}

app.use((req, res) => {
	proxy.web(req, res, {}, onProxyError);
});

const httpServer = http.createServer(app);
httpServer.listen('80');

// Listen for an upgrade to a WebSocket connection.
httpServer.on('upgrade', (req, socket, head) => {
	proxy.ws(req, socket, head, {}, onProxyError);
});
If you are using the Express package vhost for your app, you can use proxy.web inside the vhosted express function (see the following code snippet), but proxy.ws still needs to be done "globally" on your http server. Nextcloud should automatically ignore websocket requests for other domains.
const HttpProxy = require('http-proxy');
const express = require('express');
const http = require('http');

const myNextcloudApp = express();
const myOtherApp = express();
const vhost = express();

// Definitions for proxy and onProxyError unchanged. (see above)

myNextcloudApp.use((req, res) => {
	proxy.web(req, res, {}, onProxyError);
});

vhost.use(vhostFunc('<your-nc-domain>', myNextcloudApp));

const httpServer = http.createServer(app);
httpServer.listen('80');

// Listen for an upgrade to a WebSocket connection.
httpServer.on('upgrade', (req, socket, head) => {
	proxy.ws(req, socket, head, {}, onProxyError);
});
⚠️ Please note: look into this to adapt the above example configuration.
Synology Reverse Proxy
click here to expand
Disclaimer: it might be possible that the config below is not working 100% correctly, yet. Improvements to it are very welcome!
See these screenshots for a working config:
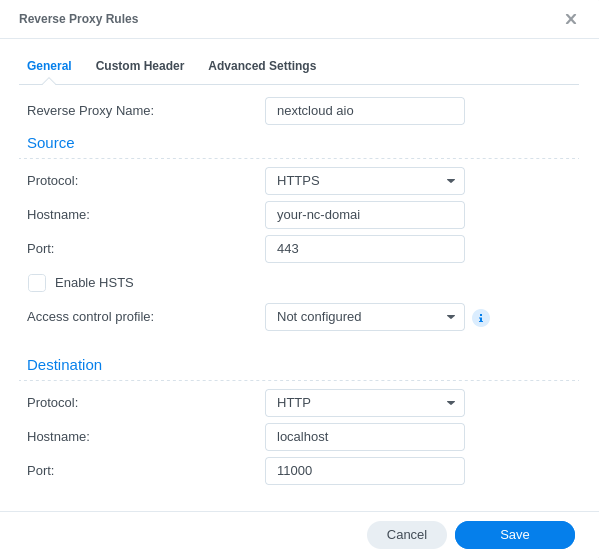
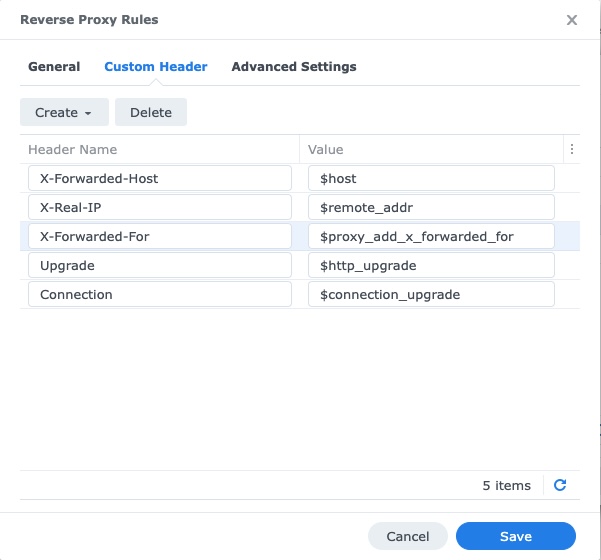
⚠️ Please note: look into this to adapt the above example configuration.
Tailscale (Serve)
Click here to expand
Tailscale can be used to provide private access to your Nextcloud AIO instance without opening ports on your firewall. With Tailscale Serve, your Nextcloud is accessible only to devices on your Tailscale network (tailnet) via a secure HTTPS domain.
For a detailed setup guide using Tailscale Serve with Nextcloud AIO, see this guide by @Perseus333: https://github.com/nextcloud/all-in-one/discussions/6817
The guide covers:
- Setting up system-wide (non-containerized) Tailscale as a reverse proxy
- Configuring Nextcloud AIO to work with Tailscale Serve
- Using Tailscale's MagicDNS to provide automatic HTTPS certificates
- Private access via your tailnet (e.g.,
yourserver.tail0a12b3.ts.net)
⚠️ Please note: This guide covers Tailscale Serve for private tailnet access. If you need public Internet access, consider using Tailscale Funnel.
Traefik 2
click here to expand
Hint: You may have a look at this video for a more complete but possibly outdated example.
Disclaimer: it might be possible that the config below is not working 100% correctly, yet. Improvements to it are very welcome!
Traefik's building blocks (router, service, middlewares) need to be defined using dynamic configuration similar to this official Traefik configuration example. Using docker labels won't work because of the nature of the project.
The examples below define the dynamic configuration in YAML files. If you rather prefer TOML, use a YAML to TOML converter.
-
In Traefik's static configuration define a file provider for dynamic providers:
# STATIC CONFIGURATION entryPoints: https: address: ":443" # Create an entrypoint called "https" that uses port 443 transport: respondingTimeouts: readTimeout: 24h # Allows uploads > 100MB; prevents connection reset due to chunking (public upload-only links) # If you want to enable HTTP/3 support, uncomment the line below # http3: {} certificatesResolvers: # Define "letsencrypt" certificate resolver letsencrypt: acme: storage: /letsencrypt/acme.json # Defines the path where certificates should be stored email: <your-email-address> # Where LE sends notification about certificates expiring tlschallenge: true providers: file: directory: "/path/to/dynamic/conf" # Adjust the path according your needs. watch: true # Enable HTTP/3 feature by uncommenting the lines below. Don't forget to route 443 UDP to Traefik (Firewall\NAT\Traefik Container) # experimental: # http3: true -
Declare the router, service and middlewares for Nextcloud in
/path/to/dynamic/conf/nextcloud.yml:http: routers: nextcloud: rule: "Host(`<your-nc-domain>`)" entrypoints: - "https" service: nextcloud middlewares: - nextcloud-chain tls: certresolver: "letsencrypt" services: nextcloud: loadBalancer: servers: - url: "http://localhost:11000" # Adjust to match APACHE_PORT and APACHE_IP_BINDING. See https://github.com/nextcloud/all-in-one/blob/main/reverse-proxy.md#adapting-the-sample-web-server-configurations-below middlewares: nextcloud-secure-headers: headers: hostsProxyHeaders: - "X-Forwarded-Host" referrerPolicy: "same-origin" https-redirect: redirectscheme: scheme: https nextcloud-chain: chain: middlewares: # - ... (e.g. rate limiting middleware) - https-redirect - nextcloud-secure-headers
⚠️ Please note: look into this to adapt the above example configuration.
Traefik 3
click here to expand
Disclaimer: it might be possible that the config below is not working 100% correctly, yet. Improvements to it are very welcome!
Traefik's building blocks (router, service, middlewares) need to be defined using dynamic configuration similar to this official Traefik configuration example. Using docker labels won't work because of the nature of the project.
The examples below define the dynamic configuration in YAML files. If you rather prefer TOML, use a YAML to TOML converter.
-
In Traefik's static configuration define a file provider for dynamic providers:
# STATIC CONFIGURATION entryPoints: https: address: ":443" # Create an entrypoint called "https" that uses port 443 transport: respondingTimeouts: readTimeout: 24h # Allows uploads > 100MB; prevents connection reset due to chunking (public upload-only links) # If you want to enable HTTP/3 support, uncomment the line below # http3: {} certificatesResolvers: # Define "letsencrypt" certificate resolver letsencrypt: acme: storage: /letsencrypt/acme.json # Defines the path where certificates should be stored email: <your-email-address> # Where LE sends notification about certificates expiring tlschallenge: true providers: file: directory: "/path/to/dynamic/conf" # Adjust the path according your needs. watch: true -
Declare the router, service and middlewares for Nextcloud in
/path/to/dynamic/conf/nextcloud.yml:http: routers: nextcloud: rule: "Host(`<your-nc-domain>`)" entrypoints: - "https" service: nextcloud middlewares: - nextcloud-chain tls: certresolver: "letsencrypt" services: nextcloud: loadBalancer: servers: - url: "http://localhost:11000" # Adjust to match APACHE_PORT and APACHE_IP_BINDING. See https://github.com/nextcloud/all-in-one/blob/main/reverse-proxy.md#adapting-the-sample-web-server-configurations-below middlewares: nextcloud-secure-headers: headers: hostsProxyHeaders: - "X-Forwarded-Host" referrerPolicy: "same-origin" https-redirect: redirectscheme: scheme: https nextcloud-chain: chain: middlewares: # - ... (e.g. rate limiting middleware) - https-redirect - nextcloud-secure-headers
⚠️ Please note: look into this to adapt the above example configuration.
IIS with ARR and URL Rewrite
click here to expand
Disclaimer: It might be possible that the config below is not working 100% correctly, yet. Improvements to it are very welcome!
Please note: Using IIS as a reverse proxy comes with some limitations:
- A maximum upload size of 4GiB, in the example configuration below the limit is set to 2GiB.
Prerequisites
- Windows Server with IIS installed.
- Application Request Routing (ARR) and URL Rewrite modules installed.
- WebSocket Protocol feature enabled.
For information on how to set up IIS as a reverse proxy please refer to this. There are also information on how to use the IIS Manager here.
The following configuration example assumes the following:
- A site has been created that is configured with HTTPS support and the desired host name.
- A server farm named
nc-server-farmhas been created and is pointing to the Nextcloud server. - No global Rewrite Rules has been created for the
nc-server-farmserver farm.
Add the following web.config file to the root of the site you created as the reverse proxy.
<?xml version="1.0" encoding="UTF-8"?>
<configuration>
  <system.web>
    <!-- Allow all urls -->
    <httpRuntime requestValidationMode="2.0" requestPathInvalidCharacters="" />
  </system.web>
  <system.webServer>
    <rewrite>
      <!-- useOriginalURLEncoding needs to be set to false, otherwise IIS will double encode urls causing all files with spaces or special characters to be inaccessible -->
      <rules useOriginalURLEncoding="false">
        <!-- Force https -->
        <rule name="Https" stopProcessing="true">
          <match url="(.*)" />
          <conditions>
            <add input="{HTTPS}" pattern="^OFF$" />
          </conditions>
          <action type="Redirect" url="https://{HTTP_HOST}/{REQUEST_URI}" appendQueryString="false" />
        </rule>
        <!-- Redirect to internal nextcloud server -->
        <rule name="To nextcloud" stopProcessing="true">
          <match url="(.*)" />
          <conditions>
            <add input="{HTTPS}" pattern="^ON$" />
          </conditions>
          <!-- Note that {UNENCODED_URL} already contains starting slash, so we must add it directly after the port number without additional slash -->
          <action type="Rewrite" url="http://nc-server-farm:11000{UNENCODED_URL}" appendQueryString="false" />
        </rule>
      </rules>
    </rewrite>
    <security>
      <!-- Increase upload limit to 2GiB -->
      <requestFiltering allowDoubleEscaping="true">
        <requestLimits maxAllowedContentLength="2147483648" />
      </requestFiltering>
    </security>
  </system.webServer>
</configuration>
⚠️ Please note: Look into this to adapt the above example configuration.
Others
click here to expand
Config examples for other reverse proxies are currently not documented. Pull requests are welcome!
2. Use this startup command
After adjusting your reverse proxy config, use the following command to start AIO:
(For a compose.yaml example, see the example further below.)
# For Linux:
sudo docker run \
--init \
--sig-proxy=false \
--name nextcloud-aio-mastercontainer \
--restart always \
--publish 8080:8080 \
--env APACHE_PORT=11000 \
--env APACHE_IP_BINDING=0.0.0.0 \
--env APACHE_ADDITIONAL_NETWORK="" \
--env SKIP_DOMAIN_VALIDATION=false \
--volume nextcloud_aio_mastercontainer:/mnt/docker-aio-config \
--volume /var/run/docker.sock:/var/run/docker.sock:ro \
ghcr.io/nextcloud-releases/all-in-one:latest
Explanation of the command
sudo docker runThis command spins up a new docker container. Docker commands can optionally be used withoutsudoif the user is added to the docker group (this is not the same as docker rootless, see FAQ in the normal readme).--initThis option makes sure that no zombie-processes are created, ever. See the Docker documentation.--sig-proxy=falseThis option allows to exit the container shell that gets attached automatically when usingdocker runby using[CTRL] + [C]without shutting down the container.--name nextcloud-aio-mastercontainerThis is the name of the container. This line is not allowed to be changed, since mastercontainer updates would fail.--restart alwaysThis is the "restart policy".alwaysmeans that the container should always get started with the Docker daemon. See the Docker documentation for further detail about restart policies: https://docs.docker.com/config/containers/start-containers-automatically/--publish 8080:8080This means that port 8080 of the container should get published on the host using port 8080. This port is used for the AIO interface and uses a self-signed certificate by default. You can also use a different host port if port 8080 is already used on your host, for example--publish 8081:8080(only the first port can be changed for the host, the second port is for the container and must remain at 8080).--env APACHE_PORT=11000This is the port that is published on the host that runs Docker and Nextcloud AIO at which the reverse proxy should point at.--env APACHE_IP_BINDING=0.0.0.0This can be modified to allow access to the published port on the host only from certain ip-addresses. See this documentation--env APACHE_ADDITIONAL_NETWORK=""This can be used to put the sibling apache container that is created by AIO into a specified network - useful if your reverse proxy runs as a container on the same host. See this documentation--env SKIP_DOMAIN_VALIDATION=falseThis can be set totrueif the domain validation does not work and you are sure that you configured everything correctly after you followed the debug documentation. Also see this documentation.--volume nextcloud_aio_mastercontainer:/mnt/docker-aio-configThis means that the files that are created by the mastercontainer will be stored in a docker volume that is callednextcloud_aio_mastercontainer. This line is not allowed to be changed, since built-in backups would fail later on.--volume /var/run/docker.sock:/var/run/docker.sock:roThe docker socket is mounted into the container which is used for spinning up all the other containers and for further features. It needs to be adjusted on Windows/macOS and on docker rootless. See the applicable documentation on this. If adjusting, don't forget to also setWATCHTOWER_DOCKER_SOCKET_PATH! If you dislike this, see https://github.com/nextcloud/all-in-one/tree/main/manual-install.ghcr.io/nextcloud-releases/all-in-one:latestThis is the docker container image that is used.- Further options can be set using environment variables, for example
--env NEXTCLOUD_DATADIR="/mnt/ncdata"(This is an example for Linux. See this for other OS' and for an explanation of what this value does. This specific one needs to be specified upon the first startup if you want to change it to a specific path instead of the default Docker volume). To see explanations and examples for further variables (like changing the location of Nextcloud's datadir or mounting some locations as external storage into the Nextcloud container), read through this readme and look at the docker-compose file: https://github.com/nextcloud/all-in-one/blob/main/compose.yaml
Note: you may be interested in adjusting Nextcloud’s datadir to store the files in a different location than the default docker volume. See this documentation on how to do it.
You should also think about limiting the Apache container to listen only on localhost in case the reverse proxy is running on the same host and in the host network, by providing an additional environmental variable to this docker run command. See point 3.
On macOS see https://github.com/nextcloud/all-in-one#how-to-run-aio-on-macos.
Command for Windows
On Windows, install Docker Desktop (and don't forget to enable ipv6 if you should need that) and run the following command in the command prompt:
docker run ^
--init ^
--sig-proxy=false ^
--name nextcloud-aio-mastercontainer ^
--restart always ^
--publish 8080:8080 ^
--env APACHE_PORT=11000 ^
--env APACHE_IP_BINDING=0.0.0.0 ^
--env APACHE_ADDITIONAL_NETWORK="" ^
--env SKIP_DOMAIN_VALIDATION=false ^
--volume nextcloud_aio_mastercontainer:/mnt/docker-aio-config ^
--volume //var/run/docker.sock:/var/run/docker.sock:ro ^
ghcr.io/nextcloud-releases/all-in-one:latest
Also, you may be interested in adjusting Nextcloud's Datadir to store the files on the host system. See this documentation on how to do it.
On Synology DSM see https://github.com/nextcloud/all-in-one#how-to-run-aio-on-synology-dsm
Inspiration for a docker-compose file
Simply translate the docker run command into a docker-compose file. You can have a look at this file for some inspiration but you will need to modify it either way. You can find further examples here: https://github.com/nextcloud/all-in-one/discussions/588
3. Limit the access to the Apache container
Use this environment variable during the initial startup of the mastercontainer to make the apache container only listen on localhost: --env APACHE_IP_BINDING=127.0.0.1. Attention: This is only recommended to be set if you use localhost in your reverse proxy config to connect to your AIO instance. If you use an ip-address instead of localhost, you should set it to 0.0.0.0.
4. Open the AIO interface
After starting AIO, you should be able to access the AIO Interface via https://ip.address.of.the.host:8080 and type in and validate the domain that you have configured.
⚠️ Important: do always use an ip-address if you access this port and not a domain as HSTS might block access to it later! (It is also expected that this port uses a self-signed certificate due to security concerns which you need to accept in your browser)
Enter your domain in the AIO interface that you've used in the reverse proxy config and you should be done. Please do not forget to open/forward port 3478/TCP and 3478/UDP in your firewall/router for the Talk container!
5. Optional: Configure AIO for reverse proxies that connect to nextcloud using an ip-address and not localhost nor 127.0.0.1
If your reverse proxy connects to nextcloud using an ip-address and not localhost or 127.0.0.1* you must make the following configuration changes
*: The IP address it uses to connect to AIO is not in a private IP range such as these: 127.0.0.1/8,192.168.0.0/16,172.16.0.0/12,10.0.0.0/8,fd00::/8,::1
Nextcloud trusted proxies
Add the IP it uses connect to AIO to the Nextcloud trusted_proxies like this:
sudo docker exec --user www-data -it nextcloud-aio-nextcloud php occ config:system:set trusted_proxies 2 --value=ip.address.of.proxy
Collabora WOPI allow list
If your reverse proxy connects to Nextcloud with an IP address that is different from the one for your domain* and you are using the Collabora server then you must also add the IP to the WOPI request allow list via Administration Settings > Administration > Office > Allow list for WOPI requests.
*: For example, the reverse proxy has a public globally routable IP and connects to your AIO instance via Tailscale with an IP in the 100.64.0.0/10 range, or you are using a Cloudflare tunnel (cloudflare notes: You must add all Cloudflare IP-Ranges to the WOPI allowlist.)
External reverse proxies connecting via VPN (e.g. Tailscale)
If your reverse proxy is outside your LAN and connecting via VPN such as Tailscale, you may want to set APACHE_IP_BINDING=AIO.VPN.host.IP to ensure only traffic coming from the VPN can connect.
6. Optional: get a valid certificate for the AIO interface
If you want to also access your AIO interface publicly with a valid certificate, you can add e.g. the following config to your Caddyfile:
https://<your-nc-domain>:8443 {
    reverse_proxy https://localhost:8080 {
        transport http {
            tls_insecure_skip_verify
        }
    }
}
⚠️ Please note: Look into this to adapt the above example configuration.
Afterwards should the AIO interface be accessible via https://ip.address.of.the.host:8443. You can alternatively change the domain to a different subdomain by using https://<your-alternative-domain>:443 instead of https://<your-nc-domain>:8443 in the Caddyfile and use that to access the AIO interface.
7. How to debug things?
If something does not work, follow the steps below:
- Make sure to exactly follow the whole reverse proxy documentation step-for-step from top to bottom!
- Make sure that you used the
docker runcommand that is described in this reverse proxy documentation. Hint: make sure that you have set theAPACHE_PORTvia e.g.--env APACHE_PORT=11000during the docker run command! - Make sure to set the
APACHE_IP_BINDINGvariable correctly. If in doubt, set it to--env APACHE_IP_BINDING=0.0.0.0 - Make sure that all ports to which your reverse proxy is pointing match the chosen
APACHE_PORT. - Make sure to follow this to adapt the example configurations to your specific setup!
- Make sure that the mastercontainer is able to spawn other containers. You can do so by checking that the mastercontainer indeed has access to the Docker socket which might not be positioned in one of the suggested directories like
/var/run/docker.sockbut in a different directory, based on your OS and the way how you installed Docker. The mastercontainer logs should help figuring this out. You can have a look at them by runningsudo docker logs nextcloud-aio-mastercontainerafter the container is started the first time. - Check if after the mastercontainer was started, the reverse proxy if running inside a container, can reach the provided apache port. You can test this by running
nc -z localhost 11000; echo $?from inside the reverse proxy container. If the output is0, everything works. Alternatively you can of course use instead oflocalhostthe ip-address of the host here for the test. - Make sure that you are not behind CGNAT. If that is the case, you will not be able to open ports properly. In that case you might use a Cloudflare Tunnel!
- If you use Cloudflare, you might need to skip the domain validation anyways since it is known that Cloudflare might block the validation attempts. In that case, see the last option below!
- If your reverse proxy is configured to use the host network (as recommended in the above docs) or running on the host, make sure that you've configured your firewall to open port 443 (and 80)!
- Check if you have a public IPv4- and public IPv6-address. If you only have a public IPv6-address (e.g. due to DS-Lite), make sure to enable IPv6 in Docker and your whole networking infrastructure (e.g. also by adding an AAAA DNS-entry to your domain)!
- Enable Hairpin NAT in your router or set up a local DNS server and add a custom dns-record that allows the server to reach itself locally
- Try to configure everything from scratch - if it still does not work by following https://github.com/nextcloud/all-in-one#how-to-properly-reset-the-instance.
- As last resort, you may disable the domain validation by adding
--env SKIP_DOMAIN_VALIDATION=trueto the docker run command. But only use this if you are completely sure that you've correctly configured everything! Also see this documentation.
8. Removing the reverse proxy
If you, at some point, want to remove the reverse proxy, here are some general steps:
-
Stop all running containers in the AIO Interface.
-
Stop and remove the mastercontainer.
sudo docker stop nextcloud-aio-mastercontainer sudo docker rm nextcloud-aio-mastercontainer -
Remove the software and configuration file that you used for the reverse proxy (see section 1).
-
Restart the mastercontainer with the docker run command from the main readme but add the two options:
--env APACHE_IP_BINDING=0.0.0.0 \
--env APACHE_PORT=443 \
Do this before the last line of the run command!
The first command ensures that the Apache container is listening on all available network interfaces and the second command configures it to listen to port 443.
-
Restart all other containers in the AIO interface.
Footnotes:
-
Ports 3478/TCP and 3478/UDP are also required if using Nextcloud Talk (but they're less likely to conflict with existing services). ↩︎